Sunday, November 28, 2010

Breakfast-y snack

I had some chocolate mini-morsels leftover from making chocolate zucchini cake, and some butter in the fridge about to expire, so I was searching around for a recipe that called my name.  I hopped over to Bakerella's site and her "featured sweet" is mini maple pancake muffins!  That means I can finally use that awesome Virginia maple syrup we got at the Bath County Farmers' Market this summer.  Perfect!

Here's the recipe:
  • Ingredients:
    • 1 cup flour
    • 1 teaspoon baking powder
    • 1/2 teaspoon baking soda
    • 1/4 teaspoon salt
    • 2 tablespoons sugar
    • 2/3 cup buttermilk
    • 1 egg
    • 2 tablespoons pure maple syrup
    • 2 tablespoons melted butter
    • 1/2 cup milk chocolate chips
  • Preheat oven to 350 degrees.
  • Combine flour, baking powder, baking soda, salt and sugar in a medium bowl. Sift together with a wire whisk.
Look, Bonnie!  I used the right kind of measuring cup! :) 

  • In another bowl, stir buttermilk, egg, maple syrup and melted butter until just combined.
  • Add wet ingredients to dry ingredients and stir with a spoon until combined.
  • Stir in chocolate chips. Reserve a few chips to sprinkle on the tops.

  • I used my cookie scoop to put the dough in the mini-cupcake pan so the muffins would all be the same size

  • Bake for 8-9 minutes - (I cooked mine for about 13 minutes - after 9 minutes I stuck a cake tester in and got dough, so back in the oven they went!)
 
 
 I let them cool for a few minutes in the pan and then, with the help of a toothpick along the edges, took them out to cool for another few minutes on a wire rack.  Then I poured some maple syrup in a bowl for dipping the muffins.

 Time to paint the nails again...

The verdict:  without dipping them into the syrup, they taste like warm chocolate chip cookies, moist on the inside and a little crunch on the outside.  If you dip them, you get the pancake taste.  Maybe substitute blueberries or bananas to get more of a pancake feel instead of dessert.

They taste awesome...

It's beginning to look a lot like Christmas...........

 DIY tree skirt


Tradition says that a bird's nest in the Christmas tree brings good health and fortune to your family for the coming year.


Friday, November 26, 2010

Boobie cupcakes

I saw a post on Cupcake Project that gave me an idea for Thanksgiving cupcakes.  She made apple cobbler cupcakes with pumpkin pie filling piped on top as frosting.  But since I had already made apple cobbler cupcakes a few weeks ago, I thought I'd just do a golden yellow cupcake and inject each one with some pie filling.  I wanted to do something fun, rather than the traditional pumpkin pie,so this sounded perfect!

I baked a frozen pumpkin pie - I know, the horror!  Not from scratch?  Who cares!?!  I did make the cupcakes from scratch, so I have that going for me...

I got my piping bag ready, fitted onto my pint glass for stability, and spooned out some of the pumpkin pie filling. 
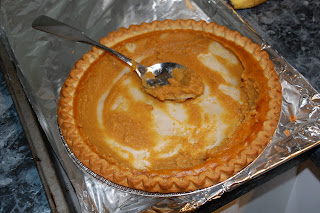
 Full pie


 Empty pie

 I injected each cupcake with a tbsp. or so of the filling.  I just eyeball it - when the cupcake starts rising like it's going to explode, you might wanna take out the piping bag.  They look like boobies, no?

I didn't frost them - because they're so heavy I wanted to do a light topping, so I picked up some Reddi-whip to add right before I served them, topped with a little sprinkle of cinnamon.  I have no pictures because we devoured them so quickly!

Hindsight - they need more pumpkin pie filling.  After biting into one, I realized the filling is only in the top inche or so of the cupcake, so the rest is just plain yellow cake.  Not that there's anything wrong with that, but it would be better if you get a little filling in every bite.  Next time (if there's a next time) I'll scoop out some of the cupcake with a spoon, like I do with the PB&J cupcakes, so I have more visibility into how much filling is in there.  

They were still good, just could have been better.  Paired with a 1/2 piece of pumpkin bread and butter, it was a good, hearty Thanksgiving dessert.

You don't have to say it...I know it's kinda tacky. But I love it!

After our Thanksgiving festivities yesterday with Dave's parents, we (read:  I) wanted to get out of the house, so we headed up to Garden Ridge.  In their Black Friday ad they had Thursday only specials, one of which was pre-cut 2-yard drapery remnants for $1.99 in assorted colors.  I thought I'd be able to find something to use as a tree skirt that had muted reds, greens, and golds, instead of using my usual quilted one.  It's kinda blah and I'm over it. 

It was our first time inside, so we didn't know what to expect when we got in there..we'd been to the one out by the airport, but this one's smaller so I thought it would be cramped like an old antique/junk shop.  The result?  I instantly fell in love and Dave rolled his eyes, as if to say "awww jeez we're gonna be in here for hours."  I felt his pain because that's really not his thing, so I tried to keep myself in check while walking around.  The first thing we noticed were Christmas trees in the weirdest colors - hot pink, yellow, royal blue, and JMU purple - on sale for $59, down from $150.  We looked at each other and I could tell we were thinking the same thing, but I said 'tacky' and we both walked away. Then we found an aisle with grilling stuff so that kept Dave busy for a few minutes while I explored.

We finally made our way back to the fabric area, and looked long and hard for the perfect fabric - basically meaning one that didn't make me want to vomit and give me flashbacks to grandma's.  Here's the one we picked:

On our way to the registers we passed the trees again, but noticed there were table-top versions of each color - less tacky, but still tacky.  I couldn't stop thinking of ways I could make that tree classy with gold, purple, and white ornaments and accents.  You know how I get when I have an idea in my head - it's hard for me to walk away.  But that's what I did.  We bought our tree skirt and headed home, where I immediately logged in to see what kind of deals I might find there today.  What do you know - those table-top trees that normally sell for $50 would be $20 today!  I can't pass that up, can I? 

I decided to sleep on it, but when I woke up this morning almost-afternoon, I knew I'd buy that thing today.  And I did.  I hoped that all the Black Friday craziness would have died down by lunchtime, and I was right.  Parking lots were full, but traffic was ok and I only almost-hit a few wayward pedestrians.  I got my tree and some decorations in my desired color scheme.  Then I went to Michael's for gold ribbon and paint markers (gold, purple, and white) for DIY ornaments, and Joann's for cheap, white tree skirt fabric ($1.29/yd BF special - score!). 

Here's my loot - I got all of it including the tree for less than $70!
  • Tree:  $20
  • Four boxes of ornaments in purple, gold, white, and clear:  $20
  • Mini-ornaments, ornament hooks, and gold beaded garlands:  $12
  • Paint markers:  $12 (that's for the 3 big ones, I'm returning the smaller ones since I didn't use them)
  • Tree skirt fabric:  $4
I know it's still $70 gone, but I think it's well worth it for a project like this - and it's a one-time investment that we'll hopefully enjoy for years!  And it gives us an opportunity to start collecting JMU ornaments that come out each year.  They're pretty reasonable and will make great stocking stuffers :)

Back to the tree, isn't it tacky and glorious?

When I first took it out of the box and spread out the branches, I thought it might be too tacky, but I gave it a chance and started putting the garlands and ornaments on it, and I think the finished product is cute.  I will acknowledge that a purple Christmas tree is unconvential and a lil trashy, but I love it.  It's grown on me so much that I'm thinking about not putting the big tree up.  Unfortch that would mean I wouldn't get to use my awesome $2 fabric, so we'll put it up tomorrow...


Here's the finished JMU tree, in all its tacky glory:

I've fixed the wonky garland in the middle since Dave took this picture...

...and some close-up shots:
I tied simple gold bows on some of the empty branches

One of my DIY ornaments - I wrote 'JMU' on one side, 'MRD' (Marching Royal Dukes) on the other, and added some music notes...


Dave's mom bought this snowman ornament for him the year he graduated and wrote his name and graduation year on it...
 I put my gold glockenspiel on the tree, to commemorate my days in the pit with the MRD's

Another DIY ornament - just 'JMU' on one side and 'dukes' on the other


Thursday, November 25, 2010

Wednesday, November 24, 2010

BFF Project Day: Part IV - Strawberry Preserves

Our last project on Sunday was freezable strawberry preserves.  This is what I made in my canning class at UR - it's so easy!

Here's all you need:
  • 8 cups strawberries, hulled and cut in half or quarters depending on their size
  • 8 cups sugar or sugar substitute
  • 1 1/2 cups water
  • 2 pouches Pectin
You can adjust the recipe based on how many strawberries you have - we might have had 10 or 12 cups but a lot of the ones I bought were bad.  That's what I get for using fruit that's not in season.  This should be a summertime activity.

First thing we did was hull and chop the strawberries in half or quarters.  Then run them through the blender to puree them as thick or thin as you like.  I personally like chunky jelly so I didn't puree them too much.

We stirred the pureed strawberries with the sugar and set it aside.  On the stove, we combined 2 pouches of fruit Pectin and 1 1/2 cups water and let it boil for a couple minutes.  When that's done, pour it into the strawberry/sugar mixture and stir it all together.

Stir for a few minutes to make sure the Pectin is evenly distributed and you're ready to can it!  Or, in this case, you're ready to Gladware it!  Make sure to get freezer-ready Gladware containers...

We used our handy Ball funnel which seems to fit any container and spooned the preserves in with a 1/2 cup measuring cup - perfect size for the containers I got. 

That's a lot of preserves!

Phew - that was a long day of projects!  But now we each have 12 containers of preserves, 3 jars of apple pie filling, finished Christmas cards, and new decor for our craft rooms!  Fun!

    Sunday, November 21, 2010

    BFF Project Day: Part III - Christmas Cards

    Well that would be a boring post, wouldn't it?  
    • Pick a card
    • Pick your recipients
    • Address envelopes
    • Add a stamp
    • Drop in the mail
    Boring!  I'll spare the world.

    I will admit this year's card is new for me.  Usually I agonize over a design, stand in Michael's for an hour choosing paper, trying 5 or 6 different marker colors, before I can pick one, and then I take 6 hours to execute the decided-upon design.  I don't have that kind of time lately, what with school, work, and making apple pie filling...so I went the other way this year.

    Here's a teaser:

    BFF Project Day:  Part IV - Strawberry Preserves is up next!

    BFF Project Day: Part II - Crafty Signage

    Last week, Bonnie emailed me and asked: "If you could use one word to display in your craft room, what would it be?"

    Um, that's a hard one.  But I went with 'create,' but had no idea why she was asking or how my answer might affect my life.  :)  Turns out, she was planning a project for us today: decorating paper mache letters - awesome!  She had also picked out 6 perfect pieces of scrapbook paper, all of which screamed my name.  We brushed mod podge on the front side of each letter, pressed the paper onto the sticky side, and then traced around the letter with a craft knife.  Easy peasy!

    Turn the letter over and you have a custom decorated monogram! 

     Can you feel Bonnie's determination?  This is what my face and posture looked like yesterday when I was making my gratitude jar.
    Also, the deck needs to be washed...

    Here are our finished projects.  Bonnie made radio for her vintage microphone and radio-themed toile craft room!

    And a close-up of mine - love the patterns!  Not matchy-matchy but complementary:

    Next up:  BFF Project Day:  Part III - Christmas Cards

    BFF Project Day: Part I - Canned Apple Pie Filling

    Bonnie came down today for marathon project session.  We planned to tackle canning apple pie filling, writing out our Christmas cards, making strawberry preserves, and creating signage for our craft rooms.  Writing about all those things would make for a marathon blog entry, so I'm breaking it up by project.  First up:  canned apple pie filling.

    I can't remember how the idea of canning pie filling came up, but I knew that sometime this fall I would re-purpose the Ball jars we used to create the centerpieces at Bonnie and Nate's anniversary party:


    They are quart-sized so they're too big for jams or jellies, and I'm confident in my made-in-bulk soup abilities, so we decided on apple pie filling.  It will be so nice to just whip out a jar and pour it into a pie crist when we have guests over or just feel like an apple pie.  Huge time saver!

    Right after I took that canning class at UR's Center for Culinary Arts, I wanted to buy all the canning supplies we used, but I thought I should wait a few weeks to make sure I'd use them before just buying them on impulse.  But once we planned this day, I went on a mission to find a pot, canning rack, and this awesome tool/utensil set from Ball.  We used all those items today, and I sent Bonnie home with her own set of tools to use later.


    I put 7 quart-sized Ball jars in the canning rack, and added that to the stock pot full of water.  I let them simmer for an hour or so to make sure the jars were warm when we added the ingredients.  The internets told me that if we poured hot filling into a room temperature jar, it would crack.  That wouldn't end well for anyone, so I thought we'd avoid that part.

    While they were simmering, Bonnie and I chopped up our apples.  I got about 6 lbs. of Jonagolds - enough to fill 7 jars, which conveniently is how many the canning rack holds.  It's funny how recipes work out that way. :)

    When all the apples were chopped up and the jars were out of the water bath, I filled each with a crapload of apples.  I thought for sure we cut way too many apples, but it was just the right amount!

    Then we made the ooey-gooey filling in a saucepan:
    • 4 1/2 cups white sugar
    • 1 cup cornstarch
    • 2 tsp. ground cinnamon
    • 1/4 tsp. ground nutmeg
    • 2 tsp. salt
    • 10 cups water
    Once the filling started bubbling we removed it from the heat and used the awesome Ball funnel to add it to our jars using a ladle.  We added 3 scoops to them all at first, and then realized we had a ton of filling left, so we added (I think) 2 or 2 1/2 more scoops to each, depending on how much free space each had.

    We used a plastic knife (for the same reason we boiled the jars before added ingredients - cold knife+warm jar=explosion) to work out any air bubbles and then added the seals and lids to the jars. 

    ***We should have put them on tightly for their water bath, but my memory failed me and I thought we were supposed to put them on loosely until after they were sealed.  So we did this next part twice, and I hope it doesn't affect the results.  The first time the lids were loose, the second time the lids were tight.

    Once the lids were on, we put the jars back into the water bath and brought the water up to a boil for 20 minutes to seal the jars.  Take the jars out of the water bath and let them cool.  It may take up to 24 hours for you to hear the popping sound of the seal, but some of ours were sealed within an hour or so.  

    Here's the finished product:

    Stay tuned for BFF Project Day:  Part II - Crafty Signage