Sunday, August 18, 2013

Biscuits 'n Gravy

Are you allowed o post pics of raw meat on the internets?

Well I'm 'bout to.  Consider yourself warned!

When I went to NYC last month to spend the weekend with 2 of my BFF's from high school, Maureen made us biscuits and gravy for breakfast!  I've never experienced biscuits and gravy.

I know, I'm sheltered and need to branch out - but my vision of biscuits and gravy was that the gravy would make the biscuits soggy and it would end up tasting like sausage soup...plus it made me think of dirty fast food joints.  Which is weird because I'm not one to shun fast food.  I can't explain it.

Anyway, I trust Maureen, so I tried it.

And it was FAB!

So fab that when I got home I wanted to run right out for ingredients so I could make it myself.  So a few days later, I did just that.  All you need is breakfast sausage, milk, flour, and biscuits.

I got sausage links because that's what Maureen used, but I assume you can use ground sausage too.  I cut the meat out of the casing and then cut it up a little before cooking it.

I didn't trust myself to eyeball anything - I'm not good at that - so I used this recipe to tell me how much flour and milk to add once the sausage was browned and removed from the pan.  As I started this part, I put the biscuits in the oven (not homemade - from a can).

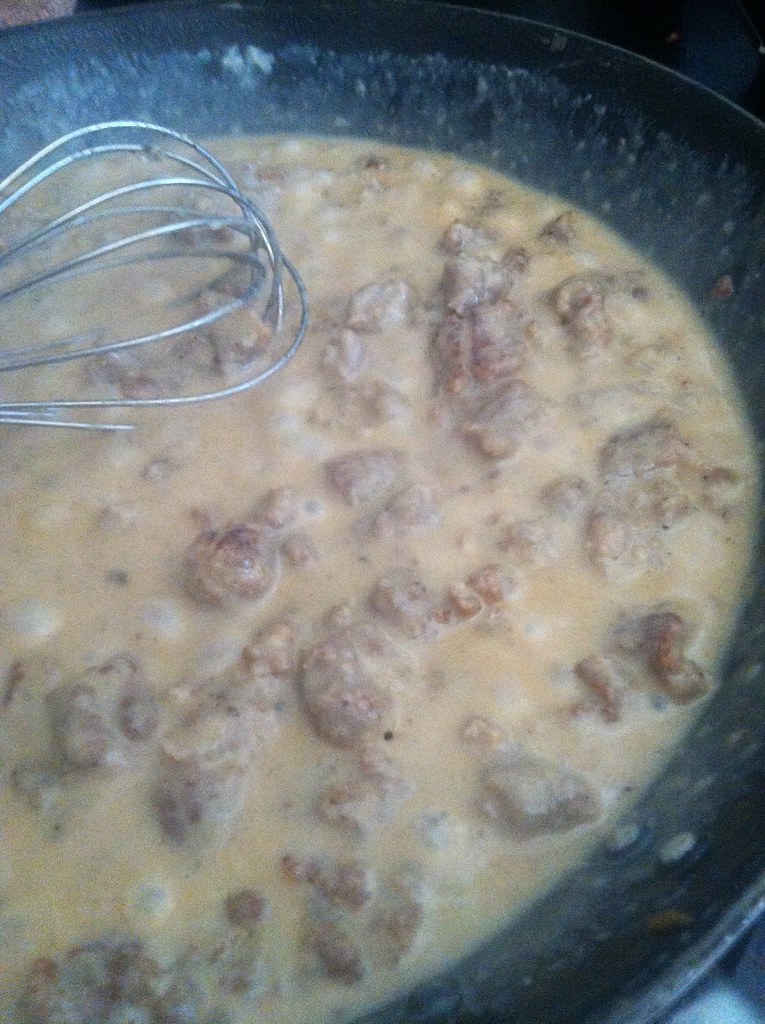
I ended up adding a total of 2-3 tbsps. of flour and 2 cups of milk to the sausage fat, adding a little of each at a time and whisking away until it thickened.  Then I added the sausage back in and stirred while it heated through.

Once it was a nice thick consistency and heated through I poured a ladle's worth onto a biscuit:

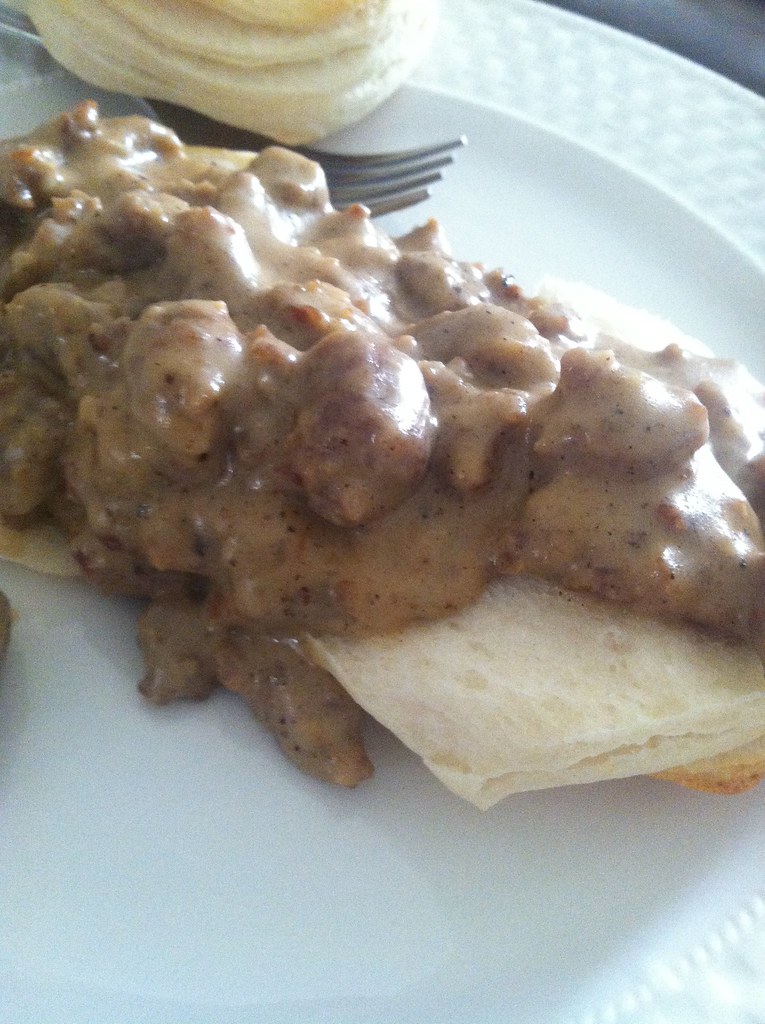
So good!  Dave is on the fence - still holding on to the fast food vision I suppose - but he ate it!  Can't wait to make this again!

Saturday, August 17, 2013

Oh Bloody Hell

If you can't talk to your BFF about this kind of thing, what do you have in life?  LOL.

One day while chatting via email, Bonnie sent me a link to something she found on Pinterest.  A little pouch to hold your feminine products - but not just any pouch.  This one has flair.

How awesome!?

Since the Etsy shop owner went on an indefinite hiatus and had no stock, I decided to make Bonnie one for her birthday.

I looked for a plain canvas zipper pouch online and couldn't find any that were reasonable unless I bought 100 or more of them.  No thanks.  Thankfully, a girl at work sells Thirty One and they had a perfectly-sized plain canvas pouch, so I snatched one up!

Of course a week after I bought it Target stocked some lesser quality ones in the Dollar Spot - bitches.  But the quality was nowhere near as good, so I didn't feel too bad.

I had a set of alphabet stamps on hand from my menu and memo boards project, and I had Dave pick up some brown fabric paint (because I thought the zipper on the pouch was brown when it was actually gray - fail, but whatevs):

I put some paint on a paper plate, and swirled it around with my sponge brush until I had a very thin layer of paint on the plate.  Then I stamped the letters into it and onto the pouch.  After I stamped the first letter I realized this was a fail:

It got worse after every letter.  I should have put something hard inside the pouch to give me some resistance, but instead chose to put a pack of napkins in there (Twilight-themed, since you asked) so on some of the letters you could see the outline of the rubber square.  Oops.

After I admitted defeat and sent Bonnie an email to say "sorry I messed up your present, but it might have been cool", I got the idea to go with the fail and make it appear as if I did it on purpose.  That might be a rule of crafting, but I'm not sure.

So I went over all the letters again, making sure to press hard enough that the outline of the stamp also got paint on it and transferred to the pouch.  

Voila?

It certainly won't win any showcases but it'll do ;)  Perfect fit for a few products!

Wednesday, August 14, 2013

10% Pinterest, 90% LAZY

Once you're in the pool, you don't want to get out.  Like ever.  amirite?

We are heading to the beach in a few weeks with friends, and Dave is so excited about pool time he researched ways to increase his relaxation and decrease trips upstairs to the kitchen for beverages.  Unfortunately, mastering this relationship between beverages and relaxation is EXPENSIVE!

Sure, you can just fill a cooler with beverages and put it on the edge of the pool, but what if you are floating in one corner, and the cooler is all the way at the opposite corner?  Vacations are not for work.  We need convenience!

We found some good pool cooler options online, but we are way too cheap to shell out $30 for a piece of plastic that I have to inflate myself:


This one is only $9 but it also only holds 1 can:
 
Then he found this on Pinterest:

Since the pool water will be much cooler than the air temperature anyway, and you can throw some ice in the tub, do you really need an actual cooler?

No.

So we headed to Target for supplies.  Technically we had everything we needed at the house, but our swim noodles are reserved floating in the pool with a noodle and our plastic bins are all ocupado.  So for $3.50 (plus 5% off for using our Target debit card - W00T!) we made our own pool cooler:

It took about 13 seconds to cut the pool noodle all the way down 1 side to create a slit:

Then we measured the tub and cut 2 pieces to attach to the longer sides:


Initially I wanted to make it fancy and have picture frame corners, but it didn't look like I wanted so I gave up.  This was not a battle for which I chose to use my OCD powers.

Then we tested it out!  It easily fits multiple cans and bottles, and I threw in a bottle opener just for fun.

Perfect.

All we need to do to complete this baby is tie a string to it so Dave can attach it to his float.  That means the Summer Shandy will never be more than an arm's length away from his mouth!

And that, my friends, is what vacation is all about.

Saturday, August 3, 2013

Top 10 Yard Sale Tips


My friends and I have had many yard sales over the years, and before our last one, we were training a newbie on what to do/what not to do, and she, in jest, said she was scared of our tips and rules and thought this was out of her league.  Haha!!

So we put together a top 10 list of how to make mo' money at a yard sale.

Before the Sale:
  • Advertising:
    • Putting a classified ad in the paper for a yard sale is TOO EXPENSIVE!  The last one cost $26 for like 2 lines.  Rubbish.
    • Do that if you want, but one time when they put our ad in the wrong section of the classifieds (a customer pointed it out to us), we still got plenty of traffic because we:
      • Posted a notice in the garage sale section on Craigslist Friday morning, Friday night, and Saturday morning
      • Put up signs around the neighborhood to attract spontaneous drive-by traffic:
        • We use just arrows attached to a pre-made Garage Sale signs because people can’t read details while they’re driving/turning at a light
        • We live right off a secondary intersection, so we started there and added a sign at each stop sign between there and our house


  • The Bigger, The Better:
    • I’ve read that customers respond better to signs that say “Multi-family yard sale” because it gives the impression that there will be more to choose from, and a better variety of items since they came from multiple homes that, hopefully, had different styles.
    • So call your friends, in-laws, and other family members to help each other clear out the clutter and make some money!
    • If you are using a shared cashbox, prepared a sheet of paper to keep track of everyone's sales.  Make sure to note how much each cash each brought to the sale  for change, so they get that money back too!

  • Planning:
    • Before anything goes outside onto a table, it needs to be priced.  Customers get annoyed if they have to ask the cost of each item.  I get annoyed when I have to make up prices on the fly.
    •  We usually start sales at 8am and leave the end time open.  That way people won’t be discouraged if they can’t make it by 12, and we can use our judgment on when it’s best to pack everything up.  Just decide when you feel like the gaps between customers become long enough that it’s not worth your time to keep sitting out in the heat.
  • Invest in a few big ticket items to help make you more money in the long run:
    • 6 foot tables:  If you have spare furniture sitting in the garage that can be used to hold for-sale items, use that; but if not, invest in a few tables from Target or Walmart.  You can find them for $31 on sale and they tuck away into a corner when not being used.
    • Garment rack:  I got one for $15 from Target a few years back, and we use that for displaying things that would turn into a pile of fabric if laid on a table, and wouldn't be noticed if left folded in a box.  Use it for purses, clothing, even jewelry hung on s-hooks so they're at eye level and don't get lost in the browse.
    • Cash box:  Sure, you could keep your cash in a change purse or extra wallet, but a cash box comes in handy for storing other yard sale items.  Plus, who wants to carry around a bag of quarters all morning?  
      • Just be careful - one time a dude tried to BUY my cashbox, and I had to joke with him that he couldn't afford it.  We laughed uncomfortably.
  • Yard Sale toolkit:
    • In addition to keeping money in your cash box, use it to store other yard sale items, like extra price stickers for last minute price-slashing, a pen for adding up customers' totals, and a calculator if you get flustered.

  • Do the Math:
    • This might be just be me, but even though I’m ok at basic addition, when someone gives me 10 small items and I have to add up their total quickly, sometimes I can get confused adding 25 to 10 and then adding 5 and then another 25.  So, to make it easier on myself, nothing is priced at less than 25 cents.
      • This method has two benefits:
        • You don’t look like a dumbass who can’t add in front of a customer
        • You only have to stock your cash box with quarters and bills.  No dimes, nickels, pennies needed!  Everything is in 25 cent increments.

  • Store layout:
    • Group like items together.  If you have multiple tables, use them for themes, like kitchen, holiday, sports, etc.  This helps customers who are shopping for specific items (and they ARE!) find what they're looking for quickly and move on to the next sale.  Plus it helps them find related items, which may help them spend more :)


During the Sale:
  • Customer Service:
    • When you go to your neighborhood bakery, which opens at 8am, you expect them to have baked goods available for sale at 8am, right?  I’d be a little pissed if I showed up and they were just starting to bake my favorite cupcake.  Why are they open if they aren’t ready for customers?
    • The same logic applies here.  If your advertisement says the sale starts at 8am, all your tables should be set up by 8am with like items grouped together, so when that early bird shows up they aren’t inconvenienced by you milling around pricing last minute additions to the sale, or ignored because you’re organizing your change.

  • Take the Deal!
    • You have already emotionally broken up (‘it’s not you, it’s me’ style) with every item in the yard sale pile, and decided that no matter what it is not coming back into your house (see rule #xxxx).  When you dumped them you landed on a best-case scenario dollar value, but already know that the worst-case scenario is that you get nothing more than a measly tax write-off if the item doesn’t sell and ends up in the Goodwill donation pile.  
    • So why not take $2 instead of the $3 on the price tag?  If the alternative is making $0, the choice is easy, right?  That extra dollar isn’t worth alienating a potential customer who hasn’t even looked through all the rest of the crap you’re getting rid of and may spend a TON of money.
After the Sale:
  • Nothing goes back into the house:
    • When you have decided the traffic has slowed enough to call the sale, it’s time to load whatever hasn’t sold into the largest vehicle available and IMMEDIATELY drop it all off at Goodwill. 
    • The IMMEDIATELY part is in caps for a reason.  If you box all that crap up and put it back in the garage to take to Goodwill later, I guarantee you it will still be sitting there when you and your girlfriends plan the next sale.  
    • So for 6 months or a year, it’s been taking up valuable real estate in your life, when it could have gone to a new home.
    • The only exception to this rule is if you have a high dollar item (electronics, for example) that you decide you just can’t donate.  Keep those and try to sell them on Craigslist.  You’ll probably get more money for them using that method, anyway.

Friday, August 2, 2013

Deep Dish Peach Pie!

Last weekend Bonnie and I took a road trip out to Carter Mountain Orchard to pick peaches.
Bonnie's photo

Just like last year, there were little to no peaches in the orchard to pick for ourselves so we walked around the country store, enjoyed the view, and bought some already-picked peaches from the market.
Bonnie's photo

We re-enacted that scene from Forrest Gump, talking about all the things we would make with our peaches!  I was hoping for a peach pie, but today at work, while I was, um, working, I came across this Pampered Chef recipe for a cobbler-ish "peach pie" that can be made in the deep covered baker.

Here is the recipe - from the Facebook page of Pampered Chef consultant, Jan Spencer:

  • refrigerated pie crust (1 rolled crust), chilled 
  • 1 tsp cinnamon (1/2 for sprinkling on crust, 1/2 for peach mixture) 
  • 1 lemon (or 1 tbsp. lemon juice)
  • 1 lb (about 8 good sized fresh) frozen peaches, thawed 
  • 1/3 cup packed brown sugar 
  • 1/4 cup pecan halves 
  • Powdered sugar and vanilla ice cream (optional) 
I'm not going to even try a tutorial, because this nice young man made a video that is much better than anything I would present.
my terrible iphone photo

We both scooped some out and added a scoop of vanilla ice cream on top - perfect summer treat!  The fresh peaches are so juicy!